.net core 2.2 升级到 3.0 正式版
结合到自己的项目上,需要的步骤记录如下:
更改目标框架版本, VS操作项目属性即可
完成后,更新 csproj 文件
<TargetFramework>netcoreapp3.0</TargetFramework>删除 Microsoft.AspNetCore.* 的引用
web项目删除所有项目的 Microsoft.AspNetCore.App 引用,需要用文本编辑器修改项目的 csproj 文件
类库项目删除包引用Microsoft.AspNetCore.App 引用, 并加入框架引用
<ItemGroup>
    <FrameworkReference Include="Microsoft.AspNetCore.App" />
</ItemGroup>
添加nuget包引用
YuanFxCore.Infrastructure加入
<PackageReference Include="Microsoft.EntityFrameworkCore" Version="3.0.0" />
<PackageReference Include="Microsoft.AspNetCore.Mvc.NewtonsoftJson" Version="3.0.0" />
YuanFxCore.Web和YuanFxCore.Dashboard加入
<PackageReference Include="Microsoft.AspNetCore.SpaServices" Version="3.0.0" />
<PackageReference Include="Microsoft.AspNetCore.SpaServices.Extensions" Version="3.0.0" />
<PackageReference Include="Microsoft.AspNet.WebApi.Client" Version="5.2.7" />
<PackageReference Include="Microsoft.AspNetCore.Mvc.NewtonsoftJson" Version="3.0.0" />
YuanFxCore.Service加入
<PackageReference Include="Microsoft.AspNet.WebApi.Client" Version="5.2.7" />
<PackageReference Include="Microsoft.AspNetCore.Mvc.NewtonsoftJson" Version="3.0.0" />
YuanFxCore.Repository加入
<PackageReference Include="Microsoft.AspNetCore.Mvc.NewtonsoftJson" Version="3.0.0" />在YuanFxCore.Web和YuanFxCore.Dashboard的csproj中PropertyGroup里加入
<AddRazorSupportForMvc>true</AddRazorSupportForMvc>
删除 <AspNetCoreHostingModel>InProcess</AspNetCoreHostingModel>
Program.cs
由于托管方式的变化,整个 Program.cs (包括AutoFac的注入方式也改变了)
        public static void Main(string[] args)
        {
            CreateHostBuilder(args).Build().Run();
        }

        public static IHostBuilder CreateHostBuilder(string[] args)
        {
            // ASP.NET Core 3.0+:
            // The UseServiceProviderFactory call attaches the
            // Autofac provider to the generic hosting mechanism.
            var host = Host.CreateDefaultBuilder(args)
                .UseServiceProviderFactory(new AutofacServiceProviderFactory()) // 启动Autofac
                .ConfigureWebHostDefaults(webHostBuilder =>
                {
                    webHostBuilder
                      .UseContentRoot(Directory.GetCurrentDirectory())
                      .UseIISIntegration()
                      .UseStartup<Startup>();
                });

            return host;
        }
Startup.cs
新增引用
using Microsoft.Extensions.Hosting;
using Microsoft.AspNetCore.SpaServices.Extensions;
ConfigureServices 方法中
将AddJsonOptions改为AddNewtonsoftJson
将 CompatibilityVersion.Version_2_2 改为 CompatibilityVersion.Version_3_0
Configure 方法中
修改 Configure 的构造函数
public void Configure(IApplicationBuilder app, IHostingEnvironment env, IOptions senparcWeixinSetting)
在 if (env.IsDevelopment()) 之前加入

app.UseRouting();
app.UseCors();
在
// 注册用户认证中间件
app.UseAuthentication();
后面加入
app.UseAuthorization();将 UseMvc 改为 UseEndpoints, UseEndpoints 函数中的内容改为
endpoints.MapControllers();
endpoints.MapControllerRoute(name: "default", pattern: "{controller=Home}/{action=Index}/{id?}");
endpoints.MapFallbackToController("Index", "Home");
删除 app.MapWhen
Unity 3D PHYSICS 3D物理引擎学习笔记 2
ADDING PHYSICS FORCES
AddForce方法用来给Rigidbody(刚体)增加外力
[code]
using UnityEngine;
using System.Collections;public class HoverPad : MonoBehaviour
{
public float hoverForce;
void OnTriggerStay (Collider other)
{
other.rigidbody.AddForce(Vector3.up * hoverForce, ForceMode.Acceleration);
}
}
[/code]
ADDING PHYSICS TORQUE
用来给Rigidbody增加用于旋转的外力
PHYSICS MATERIALS
用来控制物体在碰撞发生时的摩擦力和弹性。
Dynamic Friction(动态摩擦)是用来设定物体移动产生的摩擦力。
Static Fiction(静态摩擦)是用来设定物体从静止状态移动一个物体所需要多少力量。
Bounciness(弹力)设定物体的弹力大小。
Friction Combine(综合摩擦)是用来设定物体对其它物体材质的反应。
Friction Direction(摩擦方向)设定各轴向的摩擦力。
Dynamic Friction 2(动态摩擦力2)和Static Friction 2(静态摩擦力2)用来控制摩擦方向的三个轴向数值。
物理材质可以在物体的碰撞器属性里面指定,在碰撞体元件里面会看到一项 Material 就是用来设定物理材质的。
Joint
基本关节系统
关节会讲物体所在一个世界坐标或者一个连接的刚体上。
Fixed Joint (固定关节)
Connected Body:所挂接在的物体。
Break Force:破坏关节所需要的最小力量。
Break Torque:破坏关节所需要的最大角度。
Spring Joint(弹簧关节)
Anchor(锚点)是关节的支点。
Spring(弹性)表示弹簧的韧度,数值越高代表弹簧越紧越坚固。
Damper(阻尼)设定挂捏动作放慢的速度,数值越高代表弹簧晃过头的机会越小。
Min Distance(最小距离)和Max Distance(最大距离)
Break Force:破坏关节所需要的最小力量。
Break Torque:破坏关节所需要的最大角度。
Hinge Joint(合页/铰链关节)适用于门这种物体。
合页于弹簧关节有些参数是相似的。它的轴就是旋转的轴向。
Axis(坐标轴)代表关节以哪个轴做支点。
Motor(马达)马达设定让你的关节可以加上速度,就像旋转门一样,其中Target Velocity(目标速度)设定关节的旋转速度;Force(力量)是要达到目标速度的值;Free Spin(自由旋转)如果勾选了,则力量智慧用来帮关节加速而不会减速。
Limits(限制)是用来限制关节的动态,Min和Max用来设定关节移动的旋转角度,Min Bounce和Max Bounce(最大/最小回馈)用来设定当关节转到限制角度时所作的反应。
Raycasting
射线检测,用一条看不见的线来探测在这条线上是否与其它物体发生了碰撞。
Unity 3D PHYSICS 3D物理引擎学习笔记 1
1. Collider 碰撞体
Collider 有多种不同的形状,如果常规形状的 Collider 不能满足需求,一般有两种方法,一是用常规形状组合一个复杂形状;二是用 Mesh(网格),在使用Mesh时由于形状完全与对象一致,所以运算起来很复杂,这时可以用简化过的Mesh附加到对象上,这样级有利于复杂形状的碰撞计算,又不致于让运行太卡。
要发生碰撞,两个物体一定得有一个包含Rigidbody(刚体)。
2. Trigger 触发器
一旦在 Collider 中勾选了 Trigger,Collider 就不在有任何碰撞行为,必须由程序来控制。
生丁Trigger的标准做法是将Trigger设定为静态物体,这样它们就不会受物理引擎的影响。
用来做Trigger的碰撞体也被称作触发范围(Trigger Zone)。使用Trigger可以实现由程序来进行触发判断而不需要由物体产生实际的物理碰撞。
3. RigidBody 刚体
正常情况下,游戏里所有会动动物体都应该带有Rigidbody。刚体是让物体可以被物理所影响的元件。它带有物理属性,例如:Mass(质量)、阻力(Drag)、Angular Drag(旋转阻力)和Velocity(速度)。
刚体是触发所有物理行为的基本元件,除此之外该物体也必须有一个碰撞体才能与其它物理物体互动。
重力的设定是在菜单 Edit->Project Settings->Physics中,重力的设定是一三维的值,而Y轴的预设值时重力的实际值 -9.81。
Is Kinematic(运动体)决定物体是否会被物理行为影响。物理引擎一般只在场景初始化时检查一遍所有静态物体,如果静态物体位置发生了变化,物理引擎就必须要重新检查所有静态物体来保持物理的准确性,这样效能会大幅下降,要避免这样的问题,可以使用运动体,并透过Translate函数让运动体运动,这样物体就可以在不影响自己的情况下与其它物体产生物理行为。
简单的说,就是对该物体设置了Is Kinematic之后,每次通过translate移动该物体时,实际上该物体会主动向物理引擎汇报位置,从而提高整体的效能。Interpolate (差值)像与它下拉列表中的Extrapolate(推算)是用来解决物体的不规则位移的,当使用刚体移动时,产生了些许的不规则位移,此时你可以设置使用Interpolate项,表示利用上一帧的位置来进行平滑的位移运算;Extrapolate则是预测下一帧的坐标位置来进行平滑的位移。
Collision Detection(碰撞侦测类型), 包括Discrete(非连续性)、Continuous(连续性)、Continuous Dynamic(动态连续性),一般情况下使用Discrete(非连续性);Continuous(连续性)时让快速移动的物体能和静态物体互动的设定;Continuous Dynamic(动态连续性)是让快速移动的物体能和其它动态物体互动。
解决WordPress开启多站点模式后无法访问wp-content的Bug
本站之前使用的是 Nginx 作为 Web 服务器,不知什么时候开始(因为确实没怎么搭理过这里)空间商将 Web 服务器切换为 Apache。
这导致了一给问题,就是之前设置的针对 Nginx 做的伪静态或者是 URL 路由方式发生了变化,于是今天按照 WordPress 后台中的设置重写了一下 .htaccess 文件。
本来以为官方提供的肯定错不了,结果部署上之后发现 wp-content 和 wp-includs 两个路径无法被正常转向。官方提供的 .htaccess 内容应该是没问题的,但是苦于本博客采用的是国内的虚拟主机,而不是 VPS 之类的,所以没法直接调试。
无奈只能重写了 .htaccess 的内容。
在官方提供的 .htaccess 中间 uploaded files 之后
新增如下代码
[code lang=”shell”]RewriteRule ^([_0-9a-zA-Z-]+/)+wp-content/(.+) wp-content/$2 [R=301,NC,L]
RewriteRule ^([_0-9a-zA-Z-]+/)+wp-includes/(.+) wp-includes/$2 [R=301,NC,L][/code]
就可以了。
在Windows 2012 上的 IIS 8.5 + PHP 环境中设置 SMTP 服务
当前项目是架设在 IIS 8.5 + PHP 5.4环境下的。需要有发送邮件的功能,最常见的方式就是使用 PHP 的 Mail 函数,但是默认情况下,此函数在 IIS 中调用是失败的,需要做如下配置:
- 在服务器上『添加角色和功能』中的功能界面找到『 SMTP 服务器』并添加,它需要IIS6控制台,所以安装完成后需要使用IIS6管理界面进入管理
- 在开启 SMTP 服务器中中继功能:方法是进入 IIS 6 管理器,在SMTP Virtual server上点右键,选择属性,再选择访问选项卡,点『中继限制』中的『中继』按钮,选择『以下列表除外』(也可以保持『仅一下列表』,此时需要在下表中添加127.0.0.1)
- 设置SMTP服务为自动启动,进入系统服务,着大哦『简单邮件传输协议(SMTP)』,设置该服务启动模式为自动即可
直接使用Git部署网站到IIS上
Git可以直接部署网站到服务器上,想必已经是人尽皆知的事情了。主要是用到了Git hook技术,不过网上的资料大多都是Linux下的操作,仅有的Windows平台的文章也讲的是将Git Server安装到服务器上。其实当你用过了Azure的“网站”功能后就会觉得直接将Git中的文件部署到IIS上是多么爽的一件事,不过并不是所有的网站都可以部署到Azure的“网站”上。 下面就介绍一个来自Azure的开源项目,有了它你也可以实现直接通过Git发布你的项目了。 首先,项目的地址是 https://github.com/projectkudu/kudu 有几个坑需要注意:
- kudu只能用Visual Studio直接运行,如果放到IIS中运行会提示你不允许
- 必须把Git文件的文件夹放到C:\Program Files (x86)下,文件夹名称必须叫Git
- 下面官方文档中要求安装的那堆东西最好安上,免得出现稀奇古怪的错误
由于很简单,原文直接粘贴如下:
Deploying: Add Git support to your IIS server
Build n’ start!
Below I’ll assume that you have IIS 7.x installed on your local machine. If you want to go live with Kudu, simply deploy the Kudu.Web project to a site on your production/online IIS as usual.
Now open up the Kudu.sln in Visual Studio. Mark the Kudu.Web project as active (makes it bold) and hit CTRL+F5.
If everything went well you should now see the Kudu dashboard, looking like this:

Create your first Git enabled site
In your Kudu dashboard:
- Click the “Create application” link in the top menu.
- Enter a preferred name for the IIS site (I.e. “jhovgaardnet”).
- Click the blue “Create application” button.
Kudu is now creating a brand new IIS site directly on your IIS (!!) and showing you some geeky stuff:

It tells the URL to the Git remote we can push apps to, the URL to the site itself and the service URL which actually is the Git remote from before.
Let’s take a quick look in IIS to see what happend:

So Kudu is creating 2 sites with a kudu_ prefix. The first is the main site, the one hosting your application. The second is the “git remote site”/service site. Both sites is running on the same application pool.
If we go to the application URL we see a default screen:

Let’s push it!
Alright, let’s assume that you want to push a FunnelWeb blog like mine to the newly created site. First clone your fork of FunnelWeb (or whatever application you like) to your disk. Next open up a git shell (if you’re using Github for Windows, go to the repository, select tools then open a shell here). We now need to add a new remote, using the Git URL we got from Kudu. In my case I typed this:
git remote add kudu http://localhost:63185/jhovgaardnet.git
Git now knows about the repository located on our local IIS, making us able to do a simple push of our master like this:
git push kudu master
Awesome! If you didn’t mess it up, this is what you should see (not necessary the dependency installations of course):

Now updating the application URL shows my fully deployed blog, just as expected. Yes, it’s freaking awesome!
Conclusion
The next thing for you will be to deploy Kudu on your production IIS, setting up sites as Kudu sites, setting correct bindings, etc.
I really think Kudu is swell and I hope to see some interesting forks of Kudu that moves it closer to a continuous integration system with Github hooks, unit testing abilities, etc. TeamCity is cool, but it’s expensive and heavy. We need a slick open source .NET alternative and I hope Kudu is the beginning!
What do you think? Can you see the possibilities? Are you going to use Kudu?
Thanks for reading guys!
——————————–另外还有一篇官方的文档———————————–
Manual Setup Instructions
- Visual Studio 2012. Note that you need to run it as admin. Install/Update to the latest version of NuGet Package Manager (Tools -> Extensions and Updates).
- IIS >= 7, configured to run ASP.NET 4.0. This can be installed using WebPI.
- Install Git (http://git-scm.com/downloads) to the default location (we expect it in
C:\Program Files (x86)\Git\bin). - Install Node. Node is used as part of the build process for sites.
Note: If you manually install IIS, here is what needs to be enabled:

Additional prerequisites to run the functional tests
- Install the XUnit.net runner for VS 2012, which you install from Tools / Extensions & Updates
- Open your %WINDIR%\System32\inetsrv\config\applicationHost.config and look for
<applicationPoolDefaults>. Under<processModel>, make sure you don’t havesetProfileEnvironment="false". If you do, set it to true (or remove the attribute if you are running the latest Windows 8.1). - Install the URL rewrite module for IIS.
- Install IISNode
- Install TypeScript Plugin (for VS2012)
- Pretend to have the 32 bit version of Node to fool the version detection logic:
- Copy your
\Program Files\nodejsfolder to \Program Files (x86)\nodejs. - Under
\Program Files (x86)\nodejs, you need to have a folder named0.8.2, and containing node.exe version 0.8.2. And then same deal for Node 0.10.5. Yes, this is kind of painful, and we need to make it easier!
- Copy your
- The Web and WebApplications folders need to be present under
\Program Files (x86)\MSBuild\Microsoft\VisualStudio\v10.0. If you don’t have them, you may need to copy them from a machine that has VS 2010 installed. This is needed because some of the test apps target these. TODO: we need to make this easier! - Install Mercurial to the default location (we expect it in
C:\Program Files (x86)\Mercurial)
Deploying your first application
- First clone the repository.
git clone git://github.com/projectkudu/kudu.git - Open Kudu.sln as Administrator and build it.
- Set Kudu.Web as the startup project and run!
After running Kudu.Web, you should be able to use the dashboard to manage your application. Below is a walk through on how to create and deploy your first application using git.
Step 1
Create an application.

Step 2
Give it a name.

Step 3
Copy the git url and push.

Step 4
You’re live!

错误代号为800706ba时的解决方案
当开发的软件在运行时报出类似如下错误时:
检索COM类工厂中的 CLSID 为{00024500-0000-C000-000000000046}} 的组件时失败, 原因是出现以下错误: 800706ba
看到800706ba时首先就要想到是不是系统服务 “DCOM Server Process Launcher” 没启动
进入服务将其启动,十有八九就会好。
本次遇见的问题是老ERP订单系统中导出Excel时发生的。
在CentOS上升级Python
怎么说呢,高手看来其实挺简单,但是确实初学者的一道坎(话说这坎也太多了喂~)
在参考了网上的诸多做法之后,总结起来就是下面的流程:
1. 在系统 -> 管理 -> 软件更新中安装gcc,我安装的CentOS版本不包含gcc所以需要有这个过程,还好,安装是自动的。
2. 下载你想安装的Python版本,此处开始建议使用root用户,后面很方便,在终端中输入su – 回车,输入密码就进入root用户了。
[code]wget http://www.python.org/ftp/python/2.7.6/Python-2.7.6.tgz[/code]
3. 解压下载的文件并安装
[code]tar -xvf Python-2.7.6.tgz
cd Python-2.7.6
./configure
make all
make install
make clean
make distclean[/code]
4. 现在可以检查一下版本了。
[code]/usr/local/bin/python2.7 -V[/code]
5. 更新系统默认的python
[code]
mv /usr/bin/python /usr/bin/python2.6 #当前python的版本为2.6,这里就得写python2.6
ln -s /usr/local/bin/python2.7 /usr/bin/python
python -V
[/code]
6. 一般来说,网上都建议更新yun的配置文件,进入/usr/bin/yum编辑第一行,从#!/usr/bin/python改成#!/usr/bin/python2.6
好了,完事了。
在PyCharm中安装PyQt
PyCharm是非常舒服的IDE,PyQt是很强大的GUI框架,把他们结合在一起会是多么棒的开发体验。
下面就说说如何把他们弄到一起。
下载并安装PyQt,本次安装用的是PyQt 4
首先在PyCharm中安装插件(plugins)
进入Plugins 点击“Browse repositories…” 在弹出的对话框中的搜索框中输入“Native Neighbourhood”
安装这个插件。
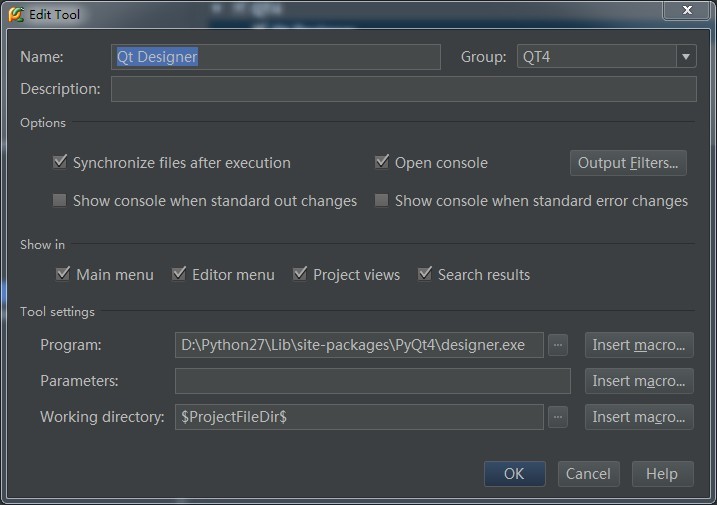
再次进入设置,点击“External Tools” 进入扩展工具管理,点击 “Add” (加号图标)
弹出的对话框做如下设置
Name:随便写就好了,写明意思就行,Group是用来组织菜单的,便于管理
在Qt Designer的设置中,program选择PyQt安装目录中designer.exe的路径
work directory 使用变量 $ProjectFileDir$ (点击后面的Insert macro按钮可以不用输入双击上屏)
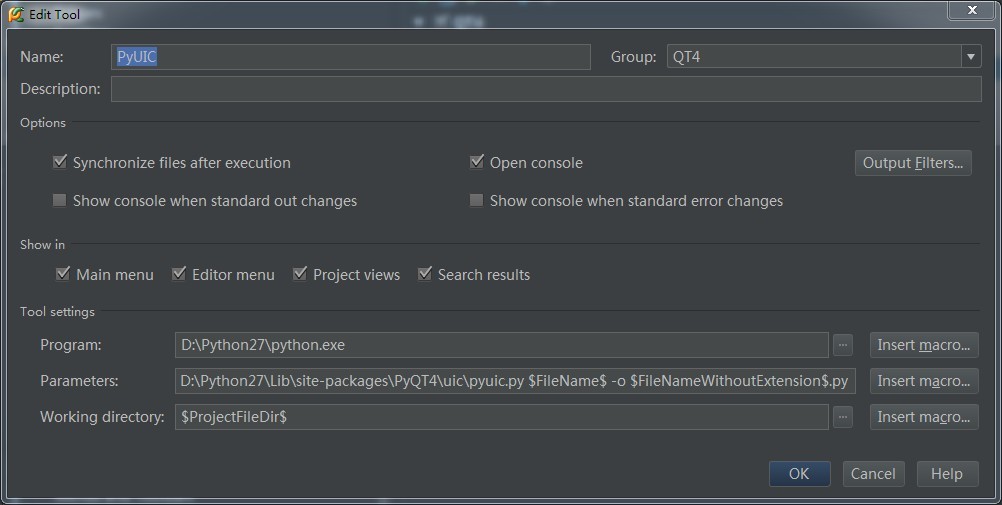
在PyUIC的设置中,其他的都差不多,program 写入Python的地址,Parameters写入
[code]Python目录\Lib\site-packages\PyQT4\uic\pyuic.py $FileName$ -o $FileNameWithoutExtension$.py[/code]
work directory 使用变量 $ProjectFileDir$
然后,享受它吧
如何在树莓派上安装CUPS实现打印服务器
有很多文章已经提到了在树莓派上安装CUPS的过程,但是文章都具有时效性,参考这些文章去做时出现了一些问题,现在记录一下流程:
首先执行更新,我之前就是没执行更新,导致后续操作错误,下载安装时会提示404 找不到文件
[code lang=”shell”]sudo apt-get update[/code]
更新一番之后继续执行,安装Cups
[code lang=”shell”]sudo apt-get install cups[/code]
配置用户
[code lang=”shell”]sudo usermod -a -G lpadmin pi[/code]
下面替换CUPS的配置文件,首先停止服务
[code lang=”shell”]sudo service cups stop[/code]
备份原有文件
[code lang=”shell”]sudo mv /etc/cups/cupsd.conf /etc/cups/cupsd.conf.bak[/code]
从服务器上下载新的配置文件
[code lang=”shell”]
cd /etc/cups/
sudo wget http://jxeeno.tk/local–files/blog:raspberry-pi:print-server/cupsd.conf
[/code]
完成,现在可以启动服务了
[code lang=”shell”]sudo service cups start[/code]
下一步设置打印机,首先将打印机连接到树莓派上,然后在浏览器中输入 https://ip:631 进入配置界面 打开的是一个网站,在上面菜单栏中找到Administrator,会提示你用户名和密码,输入树莓派的用户名和密码即可
登录后,在Printers栏目中点击Add Printer
显示的Local Printers会有你连接上的那台打印机,选中它点击continue
在这个界面Name是打印机的名字,以后用来在URL中确定打印机,所以短一些比较好、
勾选Sharing,别的不用变,点Continue
下一个界面选择驱动程序,如果在Model栏目中有打印机的型号就最好了,否则可以上传打印驱动程序
最后就设置完成了,复制最后一个界面的URL,也就是类似于http://ip:631/printers/打印机名 就可以在其他电脑上添加共享打印机了
参考地址: http://www.eeboard.com/bbs/thread-8818-1-1.html
所引用的配置文件内容:https://gist.github.com/anonymous/5562705